May 5, 2008

Little Shop of Horrors Audrey # 3 -4


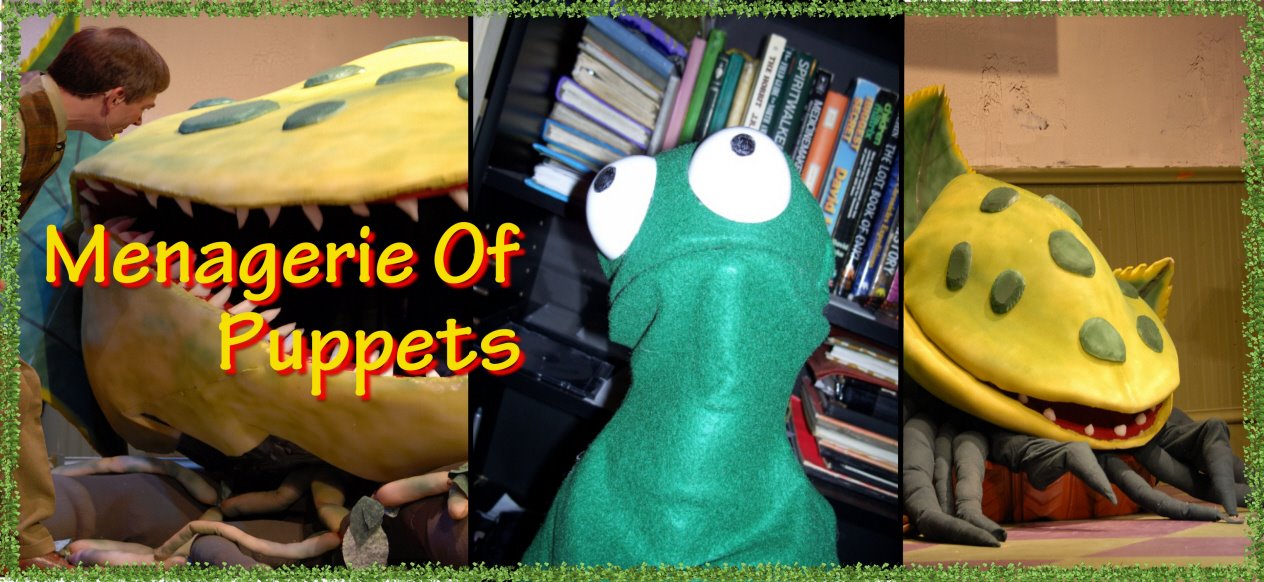
here we have the finished puppet, sorry I have no detailed pics of painting it and such but I was running out of time and forgot to take pics. anyway I can explian from the pics we have here. basically the pot the plant is sitting in is a kid pool painted rust color. I also added some brown spray painted foam inside and a small stool for the puppeteer to sit on helping her to stand when the play calls for it. also the leaves on the back are cut from foam sheeting and painted green with yellow trim and the balck lines are permenent marker. also the leaves have a thick wire down the center to help the hold there shape and they are attached to the pot with hot glue on the back and the extra wire going under the brown foam the puppeteer sits on. the pod is spray painted green with dark green foam warts hot glued on, the mouth is covered with a soft felt like maroon fabric with small foam teeth hot glued in. and lastly the puppet is stuffed with balloons to make it as light as possible. and of caorse they will need refilling from time to time.

Little Shop of Horrors Audrey # 3-3


Here we have the Roots. I basically started by making each root seprate out of a soft felt like fabric. then stuffed them with cotton and then sewed them all together into a pair of pants. I left two of the larger roots empty for the legs of the puppeteer, who later used them to make the puppet come to life as if they where a pair of hands for the planet. anyway I added straps to help hold them up and later discovered that I needed to make a sleavless shirt for the puppeteer to wear so you could not see her waist as she performed.

Little Shop of Horrors Audrey # 3-2


Next I hot glued the foam around the rounded off board. starting from the tip of the mouth. then I cut the back and rounded it off using hot glue, and leaving a hole behind the bottom jaw for the puppeteer to squeeze into. the puppet is controled by placing each arm in the top and bottom of the to jaws of the plant pod. later I discovered I needed to add a light metal bar to the inside to straighten the pods mouth for as you can see on the pictures it stays open on the ends.

Little Shop of Horrors Audrey # 3-1


So here's the start of Audrey #3. I started with foam sheeting, and 2 large pieces of art board. I cut the boards to shape and taped them together. also I cut the foam to shape making it the same as the board only larger.
Copyright 2008 J.M.S

May 1, 2008

Little Shop of Horrors Audrey #4-9


And finnaly we have the finished puppet, complete with roots that where sewn together out of fleece material and stuffed with cotton and what ever soft scraps I had laying around. they where attached to the bottom frame using hot glue the one on the front was actually slipped over the red metal thing sticking out on the fornt and two other roots where slipped over the 2/4 sticking out on the sides. the puppet moves around by rolling on the bases wheels, and the flexible frame of the top jaw allows the puppeteer to jiggle it making it seem more real when laughing, the leafs on the side where attached using the wire that I had stuck down the center leaving a bit of it on the end to jab into the bottom of the puppet and also they have a bit of velcro on the center also helping to hold them in place. The Puppteer stands inside inback of the two inner bars that join the top and bottom jaws. and controls the puppet by pulling sideways on the top jaws center bar, which turned out to be easier on the back.

Little Shop of Horrors Audrey #4-8


next the leafs where constructed out of foam sheeting, I also ran a thick wire down the center as an armature so one could shape them and bend them to there desire. I used green spray paint with some yellow on the outsides, and a thick black marker for the lines down the center.

Little Shop of Horrors Audrey #4-7


Here we have a triangle stand with small wheels that the puppet rests on, it has a front 2/4 for support from tipping to the side and also has a metal bit sticking out the front which wasn't completly neccesary yet got used in the end.
also the warts have been painted and added using hot glue.

Little Shop of Horrors Audrey #4-6


At this point the inner mouth fabric has been completed, and even recieved some black spray paint to shade up the back area. also teeth have been added made of foam, and the painting of the outer shell has begun using spray paint. the puppet was painted all splotchy for I was running out of time and needed to finish before the play opened. but to my surprise it turned out perfect. and made it look more real.

Little Shop of Horrors Audrey #4-5


Here you see the bottom jaw has it's inner mouth and the entire puppet has been foam sheeted.
you also have a better veiw of the two inner bars joined together with reusable zip ties. I also placed foam warts onto the top just to see what it looks like, they are not attached as pf yet, for we still need to paint.

Little Shop of Horrors Audrey #4-4


O.k here we have much that has been done to the puppet. first there is now two metal bars that runs down the back of both jaws about 2/3 back, and are joined together with reusable zip strips. Next we have a bar that was added to the top portion that runs down the center and extends down till it is even with the top of the bottom piece closed. We also cut out a large portion of the back leaving only the top bar that runs the leangth of the bottom piece. Then I laid down some card board on the inside of the bottom jaw, and then added batting over that, then some maroon fabric that will serve as the top layer and color of the inside of the mouth. also I started working on adding foam sheeting using hot glue to the top jaw section. but knowing what I know now I think it would have been better to use contact cement instead, for the hot glue tends to melt the foam and it gets messy at times. but it was also a life saver for attaching fabric and such.

Little Shop of Horrors Audrey #4-3

After much tweeking of the frame

Little Shop of Horrors Audrey #4-2


Here we have the finished top skeleton, with a latic duct taping job. which will aid later when I add the foam sheeting. this top piece is not as sturdy as the bottom for it did not require it like the bottom half that holds the weight of the actors.

Little Shop of Horrors Audrey #4-1


First off I made a bottom fram out of pvc tubing and electrical metal piping. Then more pvc tubing for the top section, which will be seprate in the end from the bottom, but for now we put them together to get the proper fit. this project just so you know is learn as you go. I did not know what I was doing when I started and knew that there where going to be many trials and errors as I went along. with these two pieces I later realized that using zip ties was a good way of adding streangth. and the hole in the back you see, which is actually there for the actors who get eatin to have a way out of the puppet was actual moved several times before I found the proper placment. anyway on to the next pic.